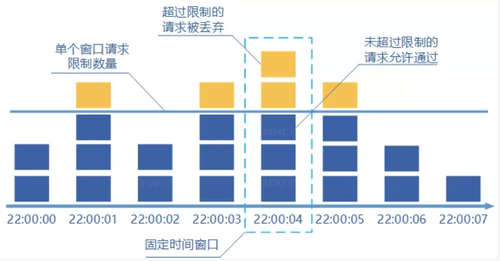
固定窗口计数器规定单位时间处理的请求数量。该算法无法保证限流速率,因而无法保证突然激增的流量。优点是容易理解,实现简单。
本文整理了固定窗口计数器的伪代码、Redis、Go 和 Java 的实现方法和思路。

规定一个接口一分钟只能访问 100 次的话:
- 给定一个变量 counter 来记录处理的请求数量
- 当 1 分钟之内处理一个请求之后
counter+1
- 1 分钟之内的如果
counter=100 的话,后续的请求就会被全部拒绝
- 等到 1 分钟结束后,将 counter 回归成 0,重新开始计数
缺点
无法保证限流速率,因而无法保证突然激增的流量。

限制一个接口一分钟只能访问 10 次,前半分钟一个请求没有接收,后半分钟接收了 10 个请求。实际对于后半分钟来说,速率大大超过了限制。
由于流量的进入往往都不是一个恒定的值,所以一旦流量进入速度有所波动,要么计数器会被提前计满,导致这个周期内剩下时间段的请求被“限制”。
伪代码实现
1
2
3
4
5
6
7
8
| 全局变量 int totalCount = 0;
if(totalCount > 限流阈值) {
return;
}
totalCount++;
|
Redis 实现
计数器限流的核心是 INCRBY 和 EXPIRE 指令。计数器算法容易出现不平滑的情况,瞬间的 QPS 有可能超过系统的承载。
1
2
3
4
5
6
7
8
9
10
11
12
13
14
15
16
17
18
19
20
21
22
23
24
|
local key = KEYS[1]
local limit = tonumber(ARGV[1])
local ttl = tonumber(ARGV[2])
local curentLimit = tonumber(redis.call('get', key) or "0")
if curentLimit + 1 > limit then
return 0
else
redis.call('INCRBY', key, 1)
if (curentLimit == 0) then
redis.call('EXPIRE', key, ttl)
end
return 1
end
|
上面代码中,利用了 Redis 的缓存过期机制实现时间窗口划分。
使用 expire 来做时间窗口限制:
- 当 key 超时,对应的数据会被 Redis 自动删除,获取时会取到空值
- 对于空值,返回默认值 0
- 如果取得默认值 0,需要重新设置过期时间,相当于到了下一个时间窗口。
同时上面代码是有问题的,如果 key 之前存在且未设置 TTL,那么限速逻辑就会永远生效了(触发 limit 值之后),使用时需要注意。
整点时间窗口
上面的实现中, expire 设定的超时时间是从第一次调用时开始计算的,并不是整点。
如果需要实现时间窗口是整点,比如 12:00-12:01 是一个时间窗口,那需要使用 expireat 命令设定超时。
1
2
3
4
5
6
7
8
9
10
11
12
13
14
15
16
17
18
19
20
21
22
23
24
|
local key = KEYS[1]
local limit = tonumber(ARGV[1])
local timestamp = tonumber(ARGV[2])
local curentLimit = tonumber(redis.call('get', key) or "0")
if curentLimit + 1 > limit then
return 0
else
redis.call('INCRBY', key, 1)
if (curentLimit == 0) then
redis.call('EXPIREAT', key, timestamp)
end
return 1
end
|
上面代码中,由调用方传入当前整点时间窗口的结束时间,当前调用是新时间窗口时直接使用作为超时时间设置。
比如调用时当前时间是 12:00:30,传入的超时时间是 12:01:00 。
Golang 实现
1
2
3
4
5
6
7
8
9
10
11
12
13
14
15
16
17
18
19
20
21
22
23
24
25
26
27
28
29
30
31
32
33
34
35
36
37
38
39
40
41
42
43
44
45
46
47
48
49
50
51
52
53
54
55
56
57
| package main
import (
"fmt"
"sync"
"time"
)
type CounterLimiter struct {
Interval int64
LastTime time.Time
MaxCount int
Lck *sync.Mutex
ReqCount int
}
func NewCounterLimiter(interval int64, maxCount int) *CounterLimiter {
return &CounterLimiter{
Interval: interval,
LastTime: time.Now(),
MaxCount: maxCount,
Lck: new(sync.Mutex),
ReqCount: 0,
}
}
func (r *CounterLimiter) counterLimit() bool {
r.Lck.Lock()
defer r.Lck.Unlock()
now := time.Now()
if now.Unix()-r.LastTime.Unix() > r.Interval {
r.LastTime = now
r.ReqCount = 0
}
if r.ReqCount < r.MaxCount {
r.ReqCount += 1
return true
}
return false
}
func main() {
r := NewCounterLimiter(1, 5)
for i := 0; i < 20; i++ {
ok := r.counterLimit()
if ok {
fmt.Println("pass ", i)
} else {
fmt.Println("limit ", i)
}
time.Sleep(100 * time.Millisecond)
}
}
|
Java 实现思路
在 Java 中可以使用本地缓存方式实现,缓存的 Key 为时间:
- 时间间隔:对分钟的秒数取模,每多少秒
- 整点时间:当前时间的分钟数
取计数器时,根据类型直接从缓存中取出并进行处理。当进入下一个时间窗口后,之前的计数器会因为无访问而过期失效。
引用
- 分布式限流:基于 Redis 实现
- 分布式系统关注点——限流该怎么做?
- 《Java Guide》
- 分布式系统限流算法分析与实现


