KubeVela 中使用用户伪装功能的主要有两个模块:KubeVela Controller 和 KubeVela API Server。
KubeVela Controller:实现了 KubeVela 的主要逻辑;
KubeVela API Server:提供 API 接口给 VelaUX。
在 KubeVela 核心组件里有两个和用户伪装相关的功能:应用认证和 ServiceAccount 伪装。VelaUX 由于自身带了一套用户权限相关的功能,当开启用户伪装后,会注入登录的用户信息作为伪装用户。
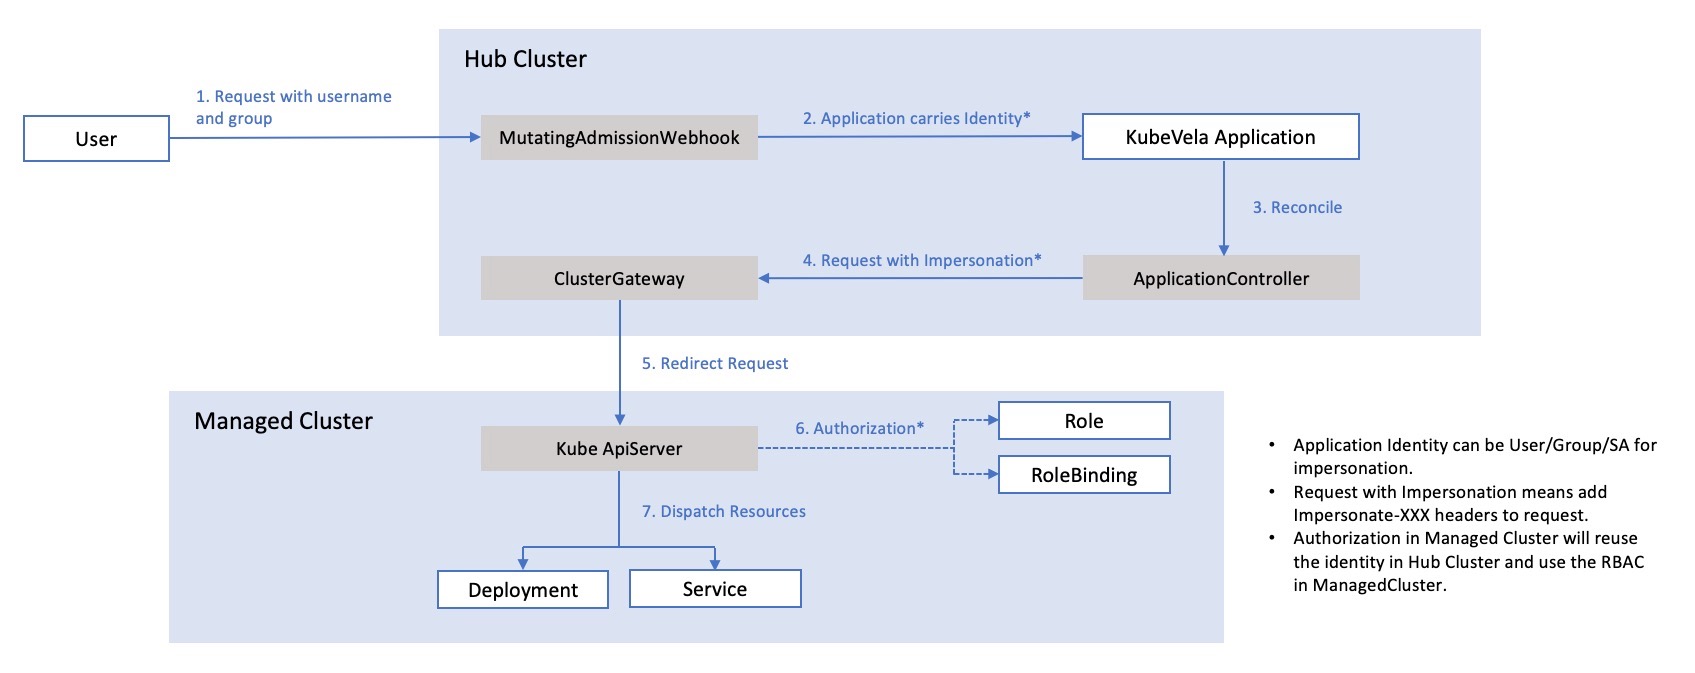
KubeVela Controller 应用认证 KubeVela 提供了一个叫做应用认证(AuthenticateApplication)的特性开关(featuregate),当该功能开启时 KubeVela Controller 会使用最后创建或修改的身份权限作为创建资源的用户身份。这个功能可以防止用户通过创建包含自身权限之外的应用来提权。
应用认证有两个阶段:应用绑定身份和伪装身份。
应用绑定身份 当用户创建应用请求(例如创建一个新应用或修改现有应用) 请求将首先由 KubeVela 中的 Application MutatingAdmissionWebhook 处理。Webhook 将从请求中提取用户信息并记录到应用的注解中。
应用身份绑定的逻辑由 application.MutatingHandler.handleIdentity() 方法处理:
pkg/webhook/core.oam.dev/v1alpha2/application/mutating_handler.go:52 1 2 3 4 5 6 7 8 9 10 11 12 13 14 15 16 17 18 func (h *MutatingHandler) bool , error ) { if !utilfeature.DefaultMutableFeatureGate.Enabled(features.AuthenticateApplication) { return false , nil } if slices.Contains(h.skipUsers, req.UserInfo.Username) { return false , nil } if metav1.HasAnnotation(app.ObjectMeta, oam.AnnotationApplicationServiceAccountName) { return false , errors.New("service-account annotation is not permitted when authentication enabled" ) } klog.Infof("[ApplicationMutatingHandler] Setting UserInfo into Application, UserInfo: %v, Application: %s/%s" , req.UserInfo, app.GetNamespace(), app.GetName()) auth.SetUserInfoInAnnotation(&app.ObjectMeta, req.UserInfo) return true , nil }
如果开启了应用认证,则不能使用 ServiceAccount 伪装指定应用运行的 SA,这两个功能互斥。
应用认证功能的 Webhook 其实是将当前 APIServer 的用户信息保存到 Application 以下注解中:
app.oam.dev/usernameapp.oam.dev/group
伪装身份 上面注入的伪装注解在 GetUserInfoInAnnotation() 函数中提取出来:
pkg/auth/userinfo.go:83 1 2 3 4 5 6 7 8 9 10 11 12 13 14 15 16 17 18 19 20 21 22 23 24 25 func GetUserInfoInAnnotation (obj *metav1.ObjectMeta) annotations := obj.GetAnnotations() if annotations == nil { annotations = map [string ]string {} } name := annotations[oam.AnnotationApplicationUsername] if serviceAccountName := annotations[oam.AnnotationApplicationServiceAccountName]; serviceAccountName != "" && name == "" { name = fmt.Sprintf("system:serviceaccount:%s:%s" , obj.GetNamespace(), serviceAccountName) } if name == "" && utilfeature.DefaultMutableFeatureGate.Enabled(features.AuthenticateApplication) { name = AuthenticationDefaultUser } return &user.DefaultInfo{ Name: name, Groups: slices.Filter( []string {}, strings.Split(annotations[oam.AnnotationApplicationGroup], groupSeparator), func (s string ) bool { return len (strings.TrimSpace(s)) > 0 }), } }
可以看出,提取时会同时处理应用认证和 ServiceAccount 伪装两个方式注入的注解。提取后交由外层两个方法使用,写入提供的 Context 中:
pkg/auth/userinfo.go:45 1 2 3 4 5 6 7 8 9 10 11 12 13 14 15 16 func ContextWithUserInfo (ctx context.Context, app *v1beta1.Application) if app == nil { return ctx } return request.WithUser(ctx, GetUserInfoInAnnotation(&app.ObjectMeta)) } func MonitorContextWithUserInfo (ctx monitorContext.Context, app *v1beta1.Application) _ctx := ctx.GetContext() authCtx := ContextWithUserInfo(_ctx, app) ctx.SetContext(authCtx) return ctx }
在 KubeVela Controller 的 Reconcile() 方法用于处理 Application 资源对象的事件,在调用 Workflow 执行应用的工作流前注入到 Context 中。
pkg/controller/core.oam.dev/v1alpha2/application/application_controller.go:110 1 2 3 4 5 6 7 8 9 10 11 12 13 14 15 16 17 18 func (r *Reconciler) error ) { ctx, cancel := ctrlrec.NewReconcileContext(ctx) defer cancel() logCtx := monitorContext.NewTraceContext(ctx, "" ).AddTag("application" , req.String(), "controller" , "application" ) logCtx.Info("Start reconcile application" ) defer logCtx.Commit("End reconcile application" ) app := new (v1beta1.Application) executor := executor.New(workflowInstance, r.Client, nil ) authCtx := logCtx.Fork("execute application workflow" ) defer authCtx.Commit("finish execute application workflow" ) authCtx = auth.MonitorContextWithUserInfo(authCtx, app) workflowState, err := executor.ExecuteRunners(authCtx, runners) }
在 KubeVela Controller 启动的 run() 函数中,使用 auth.NewImpersonatingRoundTripper 包装了一下请求:
1 2 3 4 5 6 7 8 9 10 func run (ctx context.Context, s *options.CoreOptions) error { restConfig := ctrl.GetConfigOrDie() restConfig.UserAgent = types.KubeVelaName + "/" + version.GitRevision restConfig.QPS = float32 (s.QPS) restConfig.Burst = s.Burst restConfig.Wrap(auth.NewImpersonatingRoundTripper) }
auth.NewImpersonatingRoundTripper 实现了 RoundTripper 接口,当 Client 请求发出时会调用 RoundTrip() 方法对请求进行处理,impersonatingRoundTripper 就是 KubeVela 对发给 Cluster Gateway 伪装请求头进行处理的地方。
pkg/auth/round_trippers.go:50 1 2 3 4 5 6 7 8 9 10 11 12 13 14 15 16 17 18 func (rt *impersonatingRoundTripper) error ) { ctx := req.Context() req = req.Clone(ctx) userInfo, exists := request.UserFrom(ctx) klog.V(7 ).Infof("impersonation request log. path: %s method: %s user info: %+v" , req.URL.String(), req.Method, userInfo) if exists && userInfo != nil { if name := userInfo.GetName(); name != "" { req.Header.Set(transport.ImpersonateUserHeader, name) for _, group := range userInfo.GetGroups() { req.Header.Add(transport.ImpersonateGroupHeader, group) } q := req.URL.Query() q.Add(impersonateKey, "true" ) req.URL.RawQuery = q.Encode() } } return rt.rt.RoundTrip(req) }
代码逻辑:
从 Context 取出用户信息,保存到请求头;
给 URL Query 增加一个 impersonate=true 参数(给 Cluster Gateway 作判断)
接下来请求将交给后面的 RoundTripper 处理,最终转发给 Cluster Gateway,下一步逻辑请看前面文章《Kubernetes 中的用户伪装功能 》的 APIServer 伪装处理 和 Cluster Gateway 伪装处理 的内容。
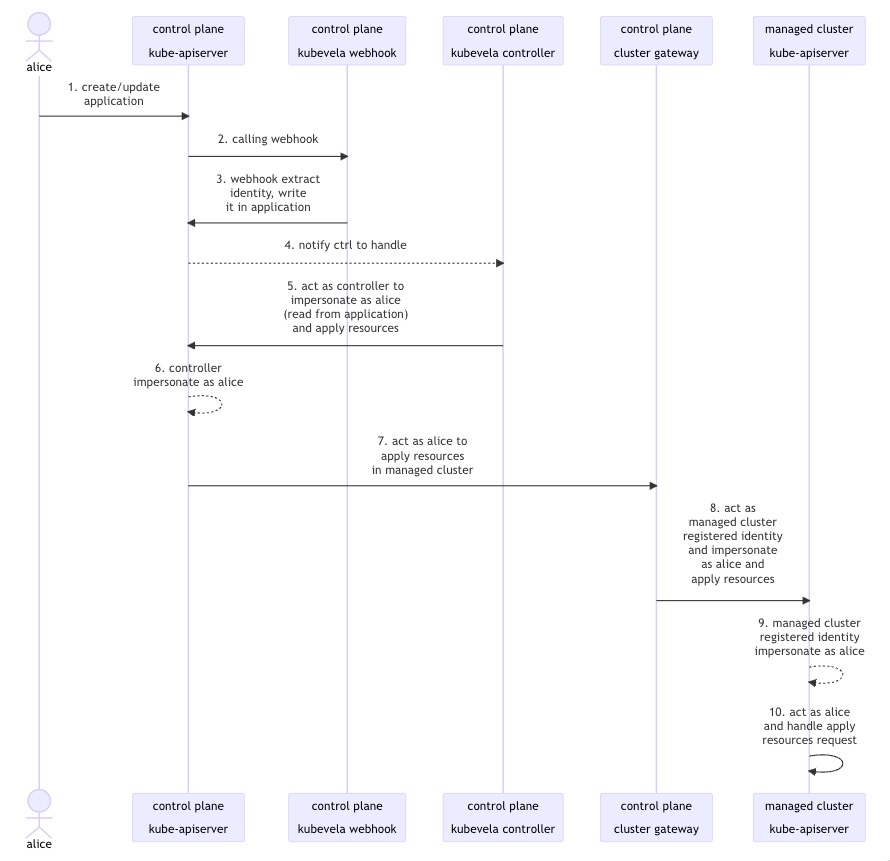
交互流程
ServiceAccount 伪装 当应用认证特性关闭时可以使用 ServiceAccount 伪装功能,让应用以指定的 ServiceAccount 运行,只需要配置 app.oam.dev/service-account-name 注解既可。
使用 ServiceAccount 伪装功能指定的 ServiceAccount 需要在纳管集群事先创建,否则会报错。
比如以下名为 deployer 的 ServiceAccount 需要进行角色绑定后才能使用:
deployer 授权 1 2 3 4 5 6 7 8 9 10 11 12 13 14 15 16 17 18 19 20 21 22 23 24 25 26 27 28 29 apiVersion: v1 kind: ServiceAccount metadata: name: deployer namespace: demo-service --- apiVersion: rbac.authorization.k8s.io/v1 kind: Role metadata: name: deployments:admin namespace: demo-service-prod rules: - apiGroups: ["apps" ] resources: ["deployments" ] verbs: ["*" ] --- apiVersion: rbac.authorization.k8s.io/v1 kind: RoleBinding metadata: name: deployments:admin namespace: demo-service-prod roleRef: apiGroup: rbac.authorization.k8s.io kind: Role name: deployments:admin subjects: - kind: ServiceAccount name: deployer namespace: demo-service
然后在 Application 中使用:
1 2 3 4 5 6 7 8 9 10 11 12 13 14 15 16 17 18 19 20 21 22 23 24 25 26 27 28 29 30 31 32 33 34 35 36 37 38 apiVersion: core.oam.dev/v1beta1 kind: Application metadata: name: multi-env-demo-with-service-account namespace: demo-service annotations: app.oam.dev/service-account-name: deployer spec: components: - name: nginx-server type: webservice properties: image: nginx:1.21 port: 80 policies: - name: env type: env-binding properties: created: false envs: - name: prod patch: components: - name: nginx-server type: webservice properties: image: nginx:1.20 port: 80 placement: namespaceSelector: name: demo-service-prod workflow: steps: - name: deploy-prod-server type: deploy2env properties: policy: env env: prod
应用认证注入的 app.oam.dev/username 和 app.oam.dev/group 注解其实我们可以手动在 Application 注解指定,可以完成和上述一样的功能。
KubeVela API Server 当 KubeVela 的 API Server 启动时,运行通过以下调用链后,来到 setKubeConfig() 函数:
server.Run() -> run() -> restServer.Run() -> s.buildIoCContainer() -> clients.SetKubeConfig() -> setKubeConfig()
这个函数使用 auth.NewImpersonatingRoundTripper 包装了 RoundTripper 以支持用户伪装的处理,前面 伪装身份 已经介绍过这个结构体,这里不再赘述。
另外 s.buildIoCContainer() 中还使用 NewAuthClient 创建了一个包装 Client:
1 2 3 4 5 6 7 8 9 10 11 12 13 14 15 16 17 18 func (s *restServer) error { err := clients.SetKubeConfig(s.cfg) if err != nil { return err } kubeConfig, err := clients.GetKubeConfig() if err != nil { return err } kubeClient, err := clients.GetKubeClient() if err != nil { return err } authClient := utils.NewAuthClient(kubeClient) }
authClient 作用是自动将 VelaUX 当前登录的用户信息提取出来,以支持伪装用户的方式保存到 Context 中:
使用原生的 request.WithUser() 方法包装 ctx;
auth.impersonatingRoundTripper{} 提取 ctx 保存到请求头。
authClient 是以代理模式方式实现的,比如 Client 的 Get() 方法,调用前调用 ContextWithUserInfo() 处理用户信息:
pkg/apiserver/utils/auth.go:90 1 2 3 4 func (c *authClient) error { ctx = ContextWithUserInfo(ctx) return c.Client.Get(ctx, key, obj) }
ContextWithUserInfo() 方法在提取用户信息前先检查是否开启 EnableImpersonation 特性,开启了才提取用户信息并转换成 Kubernetes 的用户对象,默认 EnableImpersonation 是关闭的。
pkg/apiserver/utils/auth.go:48 1 2 3 4 5 6 7 8 9 10 11 12 13 14 15 16 17 18 19 func ContextWithUserInfo (ctx context.Context) if !features.APIServerFeatureGate.Enabled(features.APIServerEnableImpersonation) { return ctx } userInfo := &user.DefaultInfo{Name: user.Anonymous} if username, ok := UsernameFrom(ctx); ok { userInfo.Name = username } if project, ok := ProjectFrom(ctx); ok && project != "" { userInfo.Groups = []string {KubeVelaProjectGroupPrefix + project, auth.KubeVelaClientGroup} } else { userInfo.Groups = []string {UXDefaultGroup} } if userInfo.Name == model.DefaultAdminUserName && features.APIServerFeatureGate.Enabled(features.APIServerEnableAdminImpersonation) { userInfo.Groups = []string {UXDefaultGroup} } return request.WithUser(ctx, userInfo) }
总结 KubeVela 作为一个应用交付平台,保证应用运行权限与创建用户的权限一致、防止应用越权是重中之重的功能。KubeVela 结合 Cluster Gateway 很好地利用了 Kubernetes 原生的用户伪装功能实现了这个需求,从更低层防止应用越权,是权限控制上比较好的实践思路。
借此思路,我也在我们公司的多集群管理系统中使用了用户伪装的功能,解决了权限控制总是浮于表面的问题。